Make A Unique Horse Head Ornament
May 09, 2025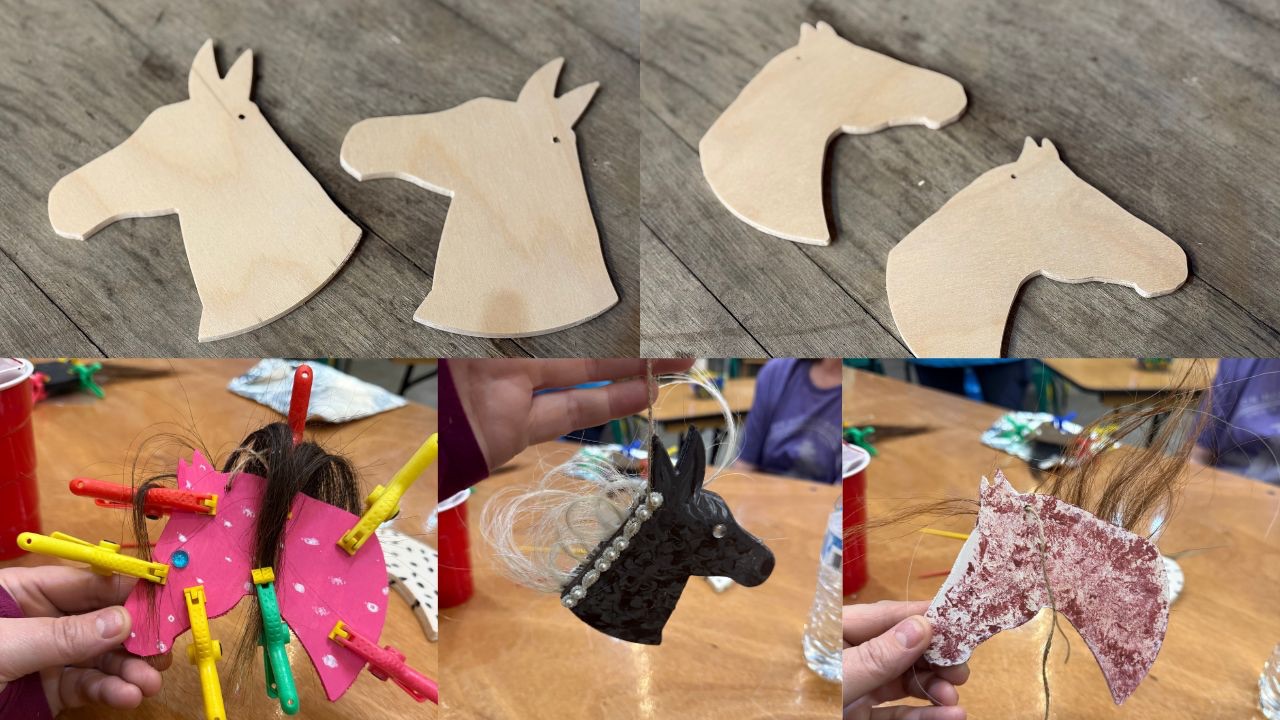
A Fun DIY Keepsake with Real Horse Hair
Looking for a heartfelt holiday craft that celebrates your love for horses or mules? Our Horse Head Ornament Kit is the perfect hands-on project for all ages! Add your own creative flair—and even a lock of your equine’s hair—for a one-of-a-kind keepsake that’s perfect for your tree or as a thoughtful gift.
Supplies List (included in the kit):
-
2 wooden cutouts (horse or mule head)
-
Hanging twine
-
Small piece of sandpaper
What you’ll need to provide:
-
Paint (any color you’d like)
-
Paintbrushes
-
Painter’s tape or masking tape
-
Real horse hair (optional, but recommended for a personal touch)
-
Scissors
-
E6000 glue or hot glue
-
Toothpick (for cleaning the twine hole)
-
4 small clamps (binder clips work too)
-
Paper, foil, or a newspaper to protect your table
Step-by-Step Instructions:
1. Prep the Wood
-
Lightly sand the edges of each wooden horse head using the provided sandpaper.
-
Important: Do not sand the flat front or back—just smooth out the edges.
2. Protect Your Workspace
-
Lay down newspaper or cardboard to protect your surface from paint spills.
3. Paint Your Horse
-
Paint the outside (front and back) of both cutouts. Lay them nose to nose, so they mirror each other.
-
Be sure to paint the outer edge/perimeter as well.
-
If using light colors like white, allow for multiple coats to get a solid finish.
-
Customize it to look like your own horse or get creative with holiday colors!
4. Cut Your Horse’s Hair (Optional)
-
Cut a lock of your horse’s mane or tail about as thick as your index finger.
-
Length should be around 8 inches, but this can vary—longer is better than shorter.
-
You don’t need a lot—just enough for a visible, meaningful accent.
5. Attach the Hair
-
Let your painted pieces dry completely.
-
Take a strip of painter’s tape and lay it sticky side up.
-
Place one end of the horse hair onto the tape, then press the tape and hair onto the unpainted back side of one ornament—not at the very edge, but slightly inward.
-
Make sure the hair reaches to the outer edge so it will be visible when sealed.
6. Glue and Clamp
-
Apply E6000 glue or hot glue directly over the taped hair section.
-
Quickly press the second horse cutout on top, aligning it perfectly with the first.
-
Use four small clamps to hold the pieces together while the glue dries.
-
Tip: If using hot glue, work fast—it dries quickly!
7. Final Touches
-
Use a toothpick to gently clear out the hole for the twine if any paint or glue seeped in.
-
Thread the twine through the hole to hang your ornament.
8. Shape the Hair
-
Once dry, you can gently press the horse hair with a heavy object (like a book) to help it lay down nicely.
Helpful Tips:
-
Personalize each ornament with your horse’s name or initials using a fine-tip paint marker.
-
Add glitter, snowflake stickers, or mini bells for extra holiday cheer.
-
If you don’t have horse hair, use yarn, ribbon, or even faux fur for a festive mane.
-
Makes a great group activity for kids, 4-H clubs, horse camps, or family crafting nights.
-
A wonderful way to honor a beloved horse that’s passed—turn a memory into a treasured keepsake.
Why You'll Love This Craft
Whether you're a horse lover, a DIY enthusiast, or just looking for a unique gift, this ornament brings joy, creativity, and heartfelt meaning to your holiday season.
Order your kit today from Building with David and create a one-of-a-kind ornament that captures the spirit of your favorite equine friend!
Stay connected with news and updates!
Join our mailing list to receive the latest news and updates.
Don't worry, your information will not be shared.
We hate SPAM. We will never sell your information, for any reason.